Overview
There are three user account types in ThreatConnect®:
- User: This is the most common user account type, covering all user accounts that can access the ThreatConnect platform UI.
- API user: This user account type has API access to the ThreatConnect platform. It cannot access the ThreatConnect platform UI.
- TAXII™ user: This user account type is used to connect to the ThreatConnect TAXII server. It cannot access the ThreatConnect platform UI.
Each user account in ThreatConnect belongs to a single Organization—often referred to as their “home Organization”—on the ThreatConnect instance. Each user account also has a System role, which determines the administrative permissions the user has on the ThreatConnect instance, and an Organization role, which determines the user’s permissions in the following areas of their Organization:
- Administration
- Creation and management of threat intelligence data
- Creation and management of playbooks
- Creation and management of Workflow Cases and Workflows
This article explains how to view user accounts and create and manage each type of user account in an Organization.
Before You Start
User Roles
Viewing User Accounts
- To view your user account on the Membership tab of the Organization Settings screen, your user account can have any Organization role.
- To view all user accounts in your home Organization on the Membership tab of the Organization Settings screen, your user account must have an Organization role of Organization Administrator or a System role of Administrator, Operations Administrator, Accounts Administrator, Community Leader, or Super User.
- To view all user accounts in all Organizations on the Membership tab of the Organization Settings screen, your user account must have a System role of Administrator, Operations Administrator, or Super User.
- To view the System role of user accounts in any Organization on the Membership tab of the Organization Settings screen, your user account must have a System role of Administrator or Operations Administrator.
Creating User Accounts
- To create user accounts in your home Organization, your user account must have an Organization role of Organization Administrator or a System role of Administrator, Operations Administrator, or Super User.NoteIn On Premises and Dedicated Cloud instances, users with a System role of Accounts Administrator can create user accounts in their home Organization with a System role of User or Read Only User, as well as API and TAXII user accounts.
- To create user accounts in any Organization on your ThreatConnect instance, your user account must have a System role of Administrator, Operations Administrator, or Super User.
Managing User Accounts
- To edit or delete user accounts in your home Organization, your user account must have an Organization role of Organization Administrator or a System role of Administrator, Operations Administrator, or Super User.NoteIn On Premises and Dedicated Cloud instances, users with a System role of Accounts Administrator can edit and delete user accounts in their home Organization.
- To edit or delete user accounts in any Organization on your ThreatConnect instance, your user account must have a System role of Administrator, Operations Administrator, or Super User.
View User Accounts
User accounts in an Organization are listed on the Membership tab of the Organization Settings screen, along with information such as each account’s System and Organization role, the account’s status (e.g., OK, Locked, Disabled), the timestamp of the account’s last login, the number of days until the account’s password expires, and the names of user groups to which the account belongs.
- Click on the entry in the Account column to view the user account’s settings (My Account screen).
- Accounts with an icon next to the entry in the Status column have multifactor authentication enabled.
View User Accounts in Your Home Organization
Follow these steps to view user accounts in your home Organization:
- From the Settings
 menu on the top navigation bar, select Organization Settings.
 - The table on the Membership tab of the Organization Settings screen shows the membership of your home Organization. Depending on your user account’s System role and Organization role, the table will list only your user account or all user accounts in your home Organization.
View User Accounts in Another Organization
Follow these steps to view user accounts in an Organization other than your home Organization:
- From the Settings menu on the top navigation bar, select Organization Settings.
- Select an Organization from the dropdown at the upper left of the screen, next to Organization Settings:.
- The table on the Membership tab of the Organization Settings screen shows the membership of the selected Organization.
Create User Accounts
Follow these steps to create user accounts in an Organization:
- From the Settings menu on the top navigation bar, select Organization Settings.
- If creating a user account in an Organization other than your home Organization, select the Organization from the dropdown at the upper left of the screen, next to Organization Settings:.
- Click one of the buttons above the table on the Membership tab of the Organization Settings screen to create the corresponding type of user account in the Organization you are viewing:HintIf a button is not present, the Organization’s limit for the number of user accounts of that type may have been reached. To increase user limits for an Organization, edit the Organization on the Organizations tab of the Account Settings screen and adjust the User Limit, API Limit, or TAXII User Limit field on the Standard Options tab of the Organization Information window (must have a System role of Administrator, Operations Administrator, or Accounts Administrator to perform this action). You can also see the number of user accounts of each type that can be created under the buttons when viewing the Membership tab of the Organization Settings screen for the Organization.
Create API User
Follow these steps to create an API user account in an Organization:
- From the Settings menu on the top navigation bar, select Organization Settings.
- If creating an API user account in an Organization other than your home Organization, select the Organization from the dropdown at the upper left of the screen, next to Organization Settings:.
- Click Create API User.
- Fill out the fields on the API User Administration window (Figure 1) as follows:
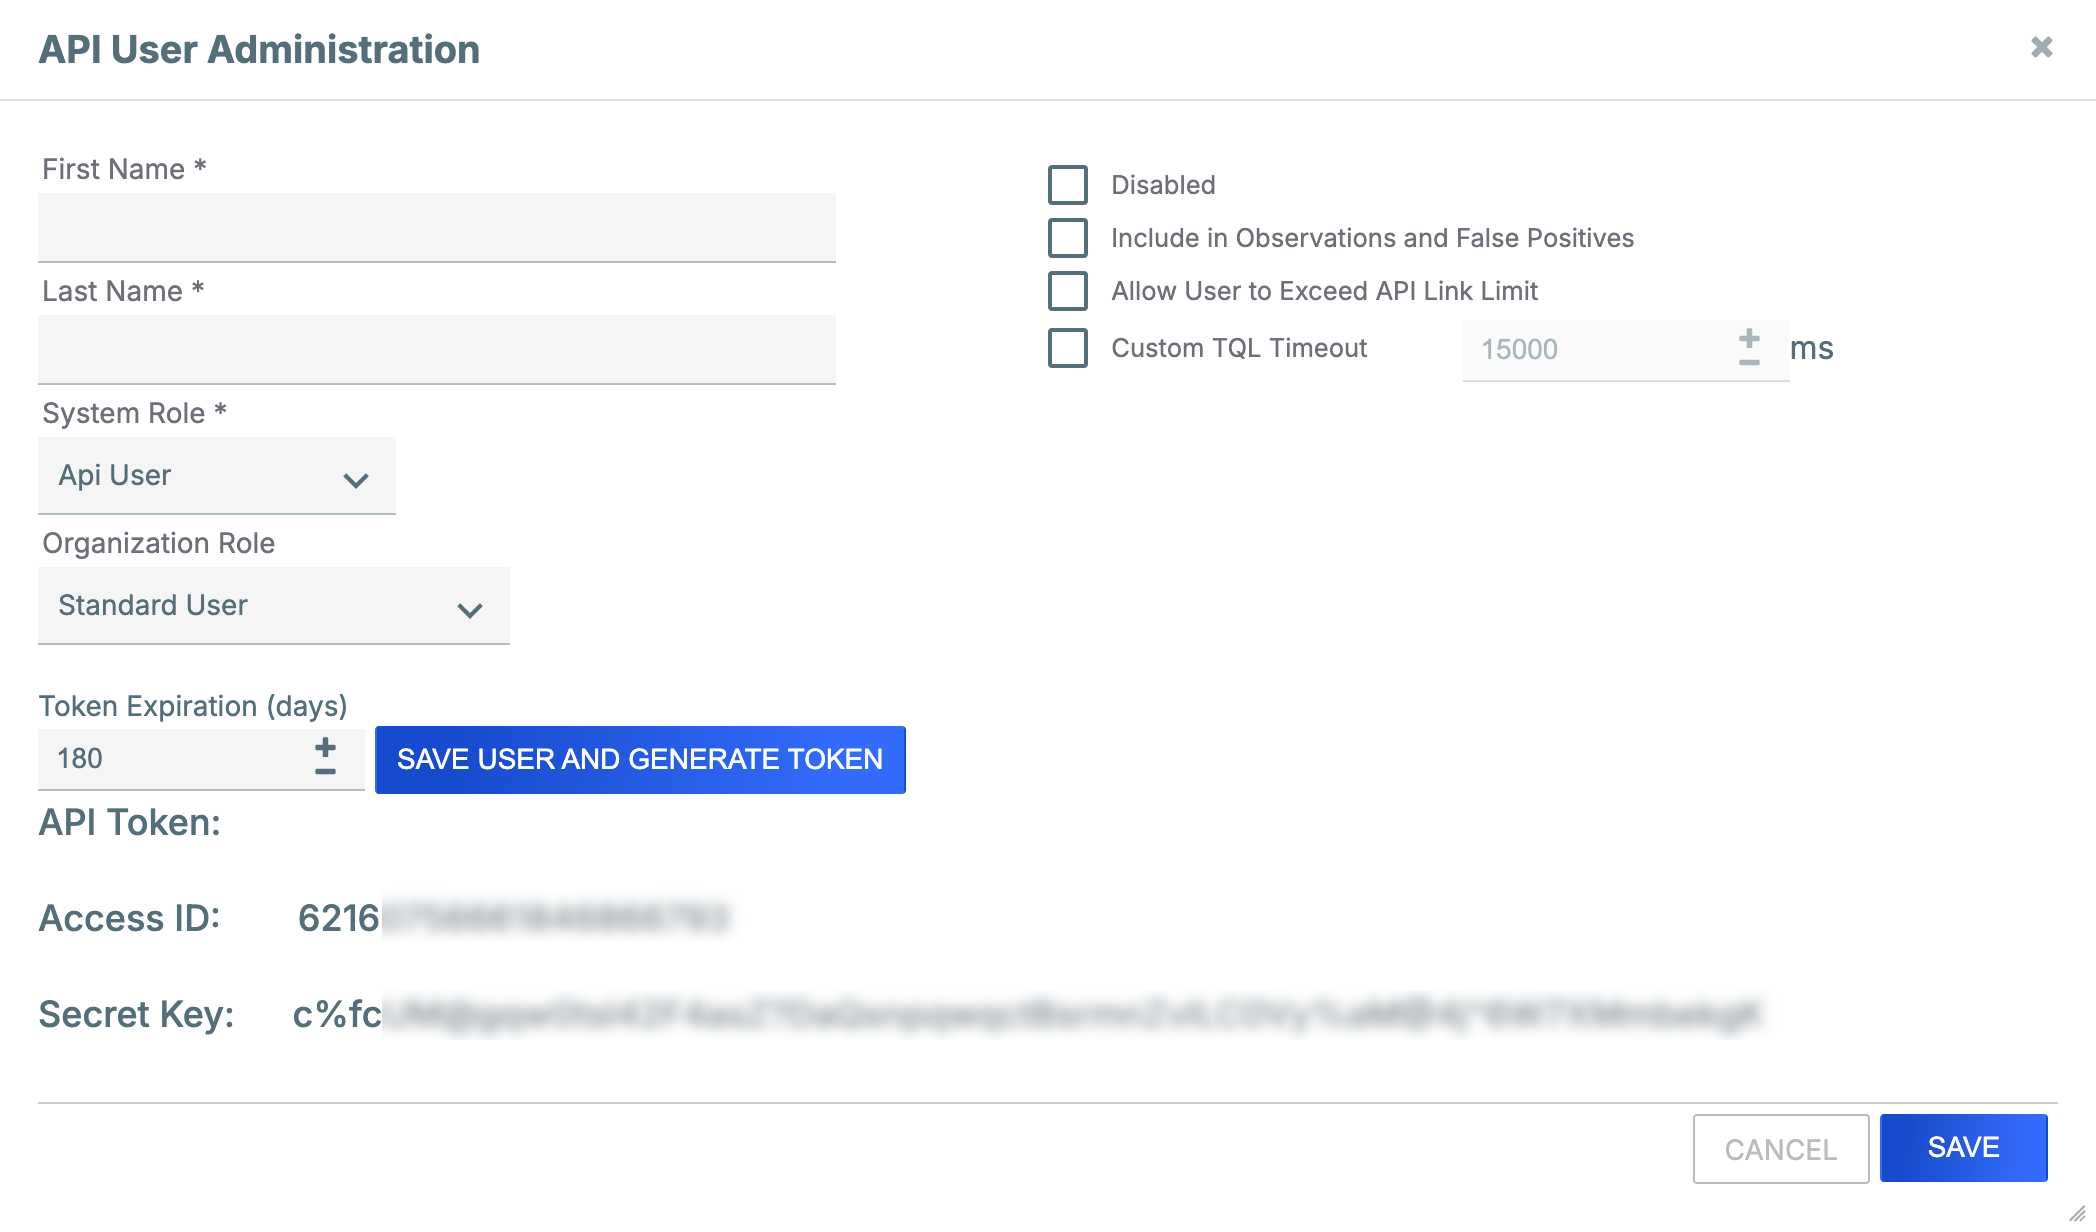
- First Name: Enter the API user’s first name.
- Last Name: Enter the API user’s last name.NoteThe API user’s first and last name are displayed in user activity logs and areas that identify users who added or modified a threat intelligence object or Case.
- System Role: Select the API user’s System role:Important
- API user accounts do not use the set of System roles available for the other user account types.
- The System Role dropdown is available only when the user creating the account has a System role of Administrator or Operations Administrator. If the dropdown is not available, a System role of Api User will be assigned automatically.
- Api User: This System role allows access to all ThreatConnect v2 and v3 API endpoints, with the exception of the v3 API TC Exchange™ administration endpoints.
- Exchange Admin: This System role allows access to all ThreatConnect v2 and v3 API endpoints, including the v3 API TC Exchange administration endpoints.
- Organization Role: Select the API user’s Organization role.
- Token Expiration (days): (Optional) Enter the number of days until the API user’s token will expire.NoteIf the API user will be using an API token to authenticate API requests to ThreatConnect, you must click SAVE USER AND GENERATE TOKEN to create the API user’s account and token.
- Disabled: (Optional) Leave this checkbox cleared. When editing an existing API user, you can select this checkbox to disable the API user’s account, which is typically done when the API user no longer requires ThreatConnect access and the administrator wishes to retain log integrity.
- Include in Observations and False Positives: (Optional) Select the checkbox to allow data provided by the API user to be included in observation and false-positive counts.
- Allow User to Exceed API Link Limit: (Optional) Select the checkbox to override the System-level limit on the number of association levels that can be retrieved at one time for intelligence items using the ThreatConnect v3 API.
- Custom TQL Timeout: (Optional) Select the checkbox to override the System-level ThreatConnect Query Language (TQL) query timeout for the API user, and then enter the maximum amount of time, in milliseconds, that TQL queries made by the API user will be allowed to run before timing out.NoteThe Custom TQL Timeout checkbox is available only when the user creating the account has a System role of Administrator or Operations Administrator.
- Use one of the following methods to save and create the API user account:
- If the API user will be using their Access ID and Secret Key to authenticate API requests to ThreatConnect, record the Secret Key, as it will not be accessible after the API User Administration window is closed. Then click SAVE.
- If the API user will be using their API token to authenticate API requests to ThreatConnect, click SAVE USER AND GENERATE TOKEN.
Create TAXII User
- See Using the ThreatConnect TAXII Server for instruction on creating a TAXII user for the TAXII 1.x server.
- See Creating a TAXII User for the TAXII 2.1 Server for instruction on creating a TAXII user for the TAXII 2.1 server.
Create User
Follow these steps to create a user account in an Organization:
- From the Settings menu on the top navigation bar, select Organization Settings.
- If creating a user account in an Organization other than your home Organization, select the Organization from the dropdown at the upper left of the screen, next to Organization Settings:.
- Click Create User.
- Fill out the fields on the User Administration window (Figure 2) as follows:
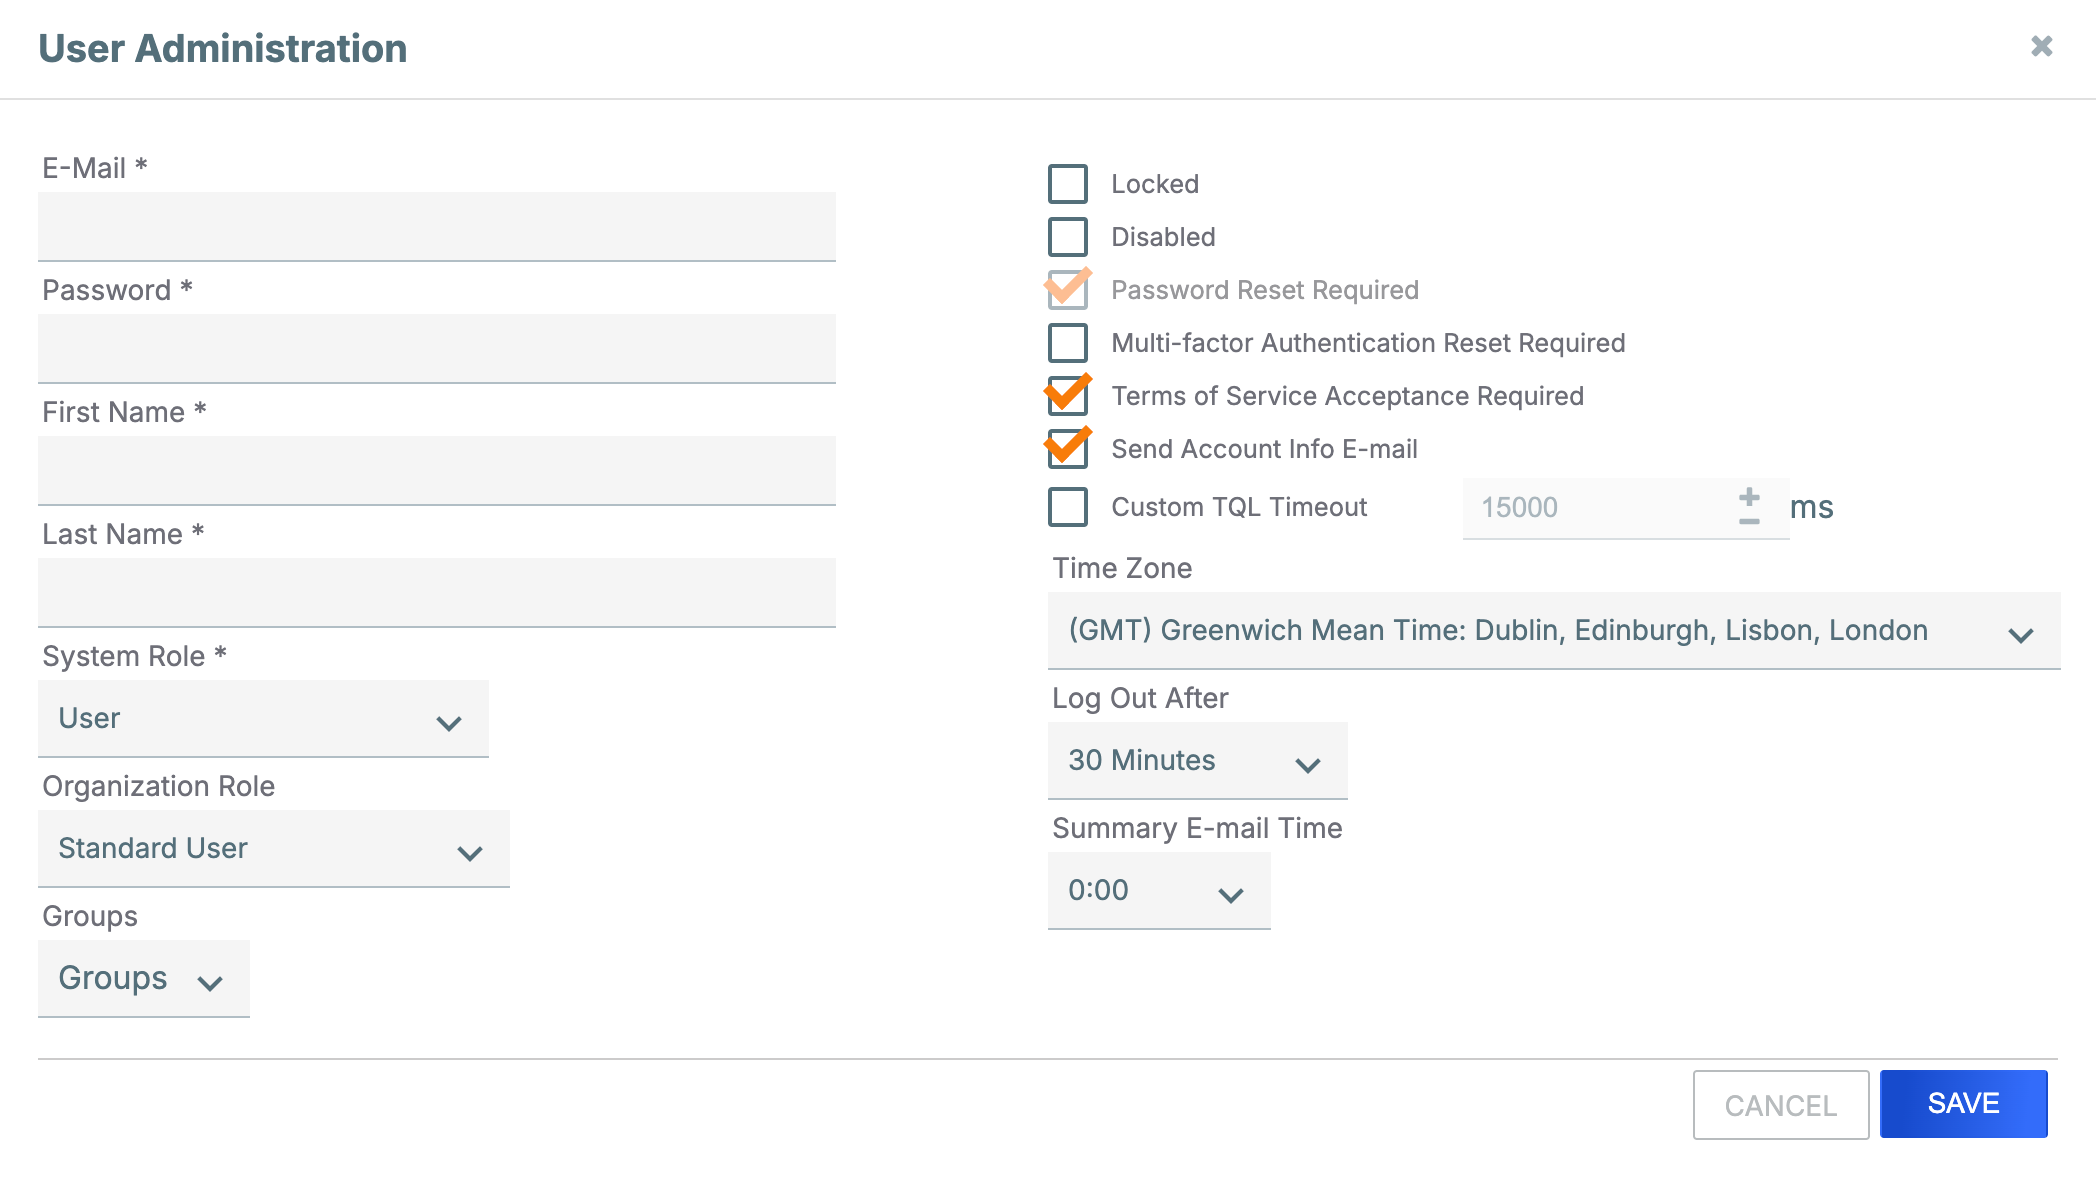
- E-Mail: Enter the user’s email address. This address will be the name of the user account.
- Password: Enter the initial user password, which is subject to the password policy defined in the ThreatConnect system settings. The user will be prompted to change this password when they log into ThreatConnect for the first time.
- First Name: Enter the user’s first name.
- Last Name: Enter the user’s last name.NoteThe user’s first and last name are displayed in user activity logs and areas that identify users who added, modified, or commented on a threat intelligence object or Case. In Communities that have profile anonymity turned off, the user’s first and last name will be displayed in notes the user has created on object Details screens and to Community Directors when viewing users in member Organizations.
- System Role: Select the user’s System role.NoteThe System Role dropdown is available only when the user creating the account has a System role of Administrator or Operations Administrator. If the dropdown is not available, a System role of User will be assigned automatically.
- Organization Role: Select the user’s Organization role.NoteSome System roles have automatically assigned Organization roles that cannot be changed. For example, if you select a System role of Super User, an Organization role of Organization Administrator is automatically assigned.
- Groups: (Optional) Select user groups to which to add the user. User groups allow multiple users to be assigned to a single Workflow Case or task.
- Locked: (Optional) Leave this checkbox cleared. When editing an existing user account that has been locked by ThreatConnect, you can clear this checkbox to unlock the account.
- Disabled: (Optional) Leave this checkbox cleared. When editing an existing user account, you can select this checkbox to disable the user account, which is typically done when a user no longer requires ThreatConnect access and the administrator wishes to retain log integrity.
- Password Reset Required: (Optional) Select this checkbox to require the user to change their account password the next time they log into ThreatConnect. This checkbox is selected by default upon account creation, and it is cleared once the password has been changed.
- Multi-Factor Authentication Reset Required: (Optional) Select this checkbox to require the user to configure multi-factor authentication (MFA) for their account or to reset MFA for a user who already has it configured (for example, if the user has lost their MFA token).NoteYou can disable MFA for a user account on the Authenticator tab of the user’s My Account screen. To navigate to this screen, click the entry in the user account’s Account column on the Membership tab of the Organization Settings screen. On ThreatConnect instances that have MFA enforced systemwide (twoFactorAuthenticationRequired system setting), you may not disable MFA for individual users.
- Terms of Service Acceptance Required: (Optional) Select this checkbox to require the user to view the ThreatConnect terms of service. It is selected by default when creating a new user.NoteThe Terms of Service Acceptance Required checkbox is available only when the user creating the account has a System role of Administrator or Operations Administrator and the termsOfServiceRequireNewUserToAccept system setting is turned on.
- Send Account Info E-mail: (Optional) Select this checkbox to send an email with the account information to the email address entered in the E-Mail field. It is selected by default when creating a new user.
- Custom TQL Timeout: (Optional) Select this checkbox to override the System-level ThreatConnect Query Language (TQL) query timeout specified in the tqlQueryTimeout system setting for the user, and then enter the maximum amount of time, in milliseconds, that TQL queries made by the user will be allowed to run before timing out.NoteThe Custom TQL Timeout checkbox is available only when the user creating the account has a System role of Administrator or Operations Administrator.
- Time Zone: (Optional) Select the user’s local time zone.
- Log Out After: (Optional) Select the amount of time of inactivity after which the user will be logged out.NoteThis dropdown is not available on SAML™-enabled instances. Instead, a logout interval set by the identity provider (IdP) is enforced for all users across the instance.
- Summary E-mail Time: (Optional) Select the time at which the user will receive daily summary emails of followed items or other notifications from ThreatConnect.
- Click SAVE.
Create Read Only User
Follow these steps to create a Read Only User account in an Organization:
- From the Settings menu on the top navigation bar, select Organization Settings.
- If creating a Read Only User account in an Organization other than your home Organization, select the Organization from the dropdown at the upper left of the screen, next to Organization Settings:.
- Click Create Read Only User.
- Fill out the fields on the User Administration window as described in Step 4 of the “Create User” section, with the following specific selections:
- System Role: Retain the selection of Read Only User.
- Organization Role: Select Read Only User or Read Only Commenter.
Manage User Accounts
Edit User Accounts
Click Edit in the Options column on the Membership tab of the Organization Settings screen to edit a user account in an Organization. The window for editing a user account is the same as the one for creating a user account, except that the Send Account Info Email checkbox not displayed only when editing a user account.
There are two notable exceptions:
- Users with a System role of Read Only User have only three Community roles available to them in any Community or Source: Commenter, User, and Banned. Therefore, users whose System role is changed to Read Only User will get the “highest” Community role available to them (Commenter) in a Community or Source if the default Community role configured for their Organization in that owner is anything other than Commenter, User, or Banned.
- Users with a System role of Super User have only one Community role available to them in any Community or Source: Director. Therefore, users whose System role is changed to Super User will get a Community role of Director regardless of the default Community role configured for their Organization.
Delete User Accounts
Click Delete in the Options column on the Membership tab of the Organization Settings screen to delete a user account in an Organization.
- If there are active playbooks assigned to execute under the user account (that is, the user account is the Run As user for the playbooks), you will be prompted to assign the playbooks to a different user account before you can complete the deletion. If there are job apps assigned to execute under the users account, you will be prompted to assign the job apps to an API user account before you can complete the deletion.
- When a user account is deleted, inactive Playbooks assigned to execute under the user account (that is, the user account is the Run As user for the playbooks) are automatically assigned to the first user account listed on the Membership tab of the Organization Settings screen.
ThreatConnect® is a registered trademark, and TC Exchange™ is a trademark, of ThreatConnect, Inc.
TAXII™ is a trademark of The MITRE Corporation.
Security Assertion Markup Language™ and SAML™ are trademarks of OASIS, the open standards consortium where the SAML specification is owned and developed. SAML is a copyrighted © work of OASIS Open. All rights reserved.
20037-01 v.15.A